jiGGafellz' Step-by-Step Guide
to Secure CD Ripping w/Exact Audio Copy
Table of contents
- The Introduction
- Installation
- Configuring the options
- Verifying or setting the
drive options
- Setting the encoder
options
- LAME mp3
- FLAC
- Monkey's Audio
- Ogg Vorbis
- Saving the compression
options to a profile
- Using EAC
- Ripping an audio cd
I. Introduction
This is a detailed and up-to-date guide to
configure the best CD extractor on the planet, also known as Exact Audio Copy,
which is made for Windows.
It will guide you through the setup It consists of information I've found on
various ripping and encoding sites, including
Hydrogen Audio. What I've done is compile the most important and
useful specifications that go into making a proper rip without giving you a lot
of filler and information that isn't understood by the average user. At
first glance, this guide may seem tedious or overwhelming, but the initial setup
of EAC along with the setup of the four encoders is a one time deal. After
that, it's smooth sailing. I might add that it isn't necessary to
configure EAC for all four encoders to use. Just the ones you prefer or
need.
Installation
The very first step is installing EAC. You
need to download EAC. You also need
a working ASPI
layer. If you have Nero installed you can copy wnaspi32.dll from the Nero
installation folder (C:\Program Files\Ahead\Nero) to your EAC installation
folder (C:\Program
Files\Exact Audio Copy) after the installation has finished. If you
don't have Nero you can download the needed file
here.
- After installation is complete, copy
wnaspi32.dll and run EAC.
- If it prompts you to run the Configuration
Wizard, click cancel then restart EAC.
Configuring the options
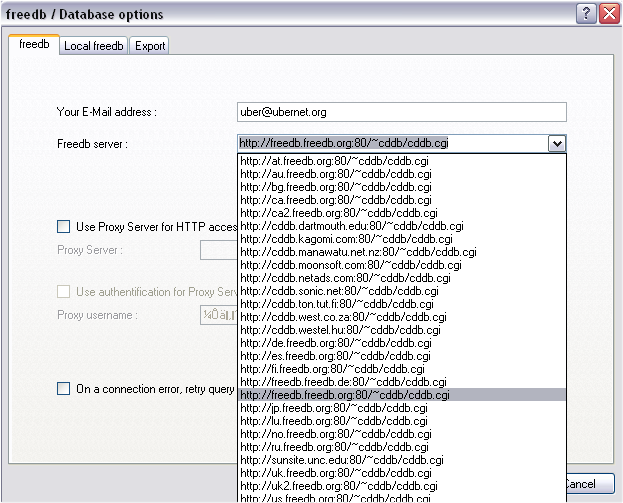
Press F12. You can enter your own email
address if you like or you can leave the
uber@ubernet.org as the default email. Select a server from the
dropdown menu. The default server is highlighted but as you can see there
are multiple servers located all over the world. Select the one you want and
click OK.
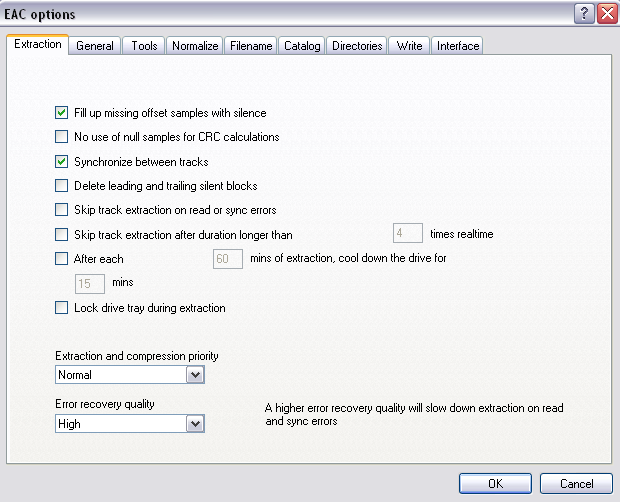
Press F9 and select the 'Extraction' tab. Check 'Fill up missing offset samples with silence' and 'Synchronize between
tracks.' Also change the Error recovery quality to High.
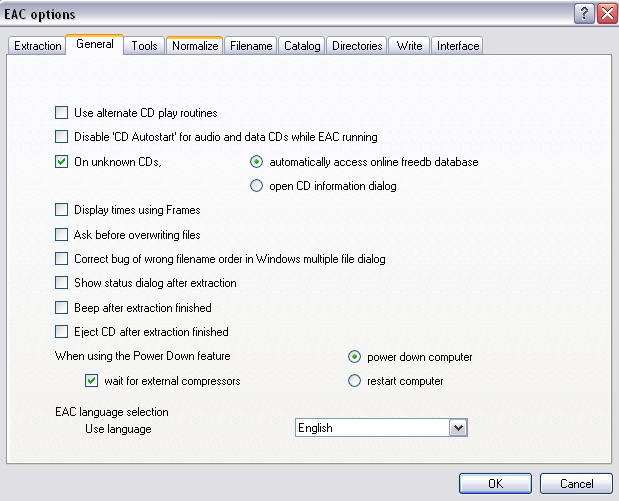
On the next tab General
check following options:
- On unknown cds automatically access online
freedb database: When you insert a cd in your drive EAC will automatically
lookup the performer, album and track titles from the online freedb
database. That saves you a lot of typing work if the cd is found in the
online database. This option makes only sense if you have a permanent
Internet connection like DSL or cable.
- When using the Power Down feature wait for
external compressors.
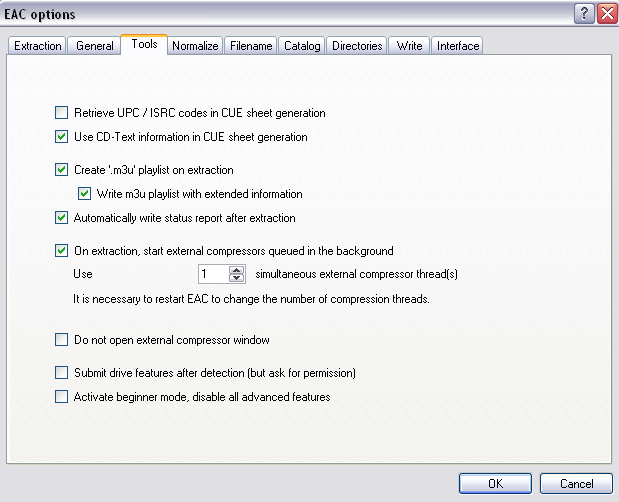
On the third tab Tools you
also must set a few options:
- Use CD-Text information in CUE sheet
generation
- Create '.m3u' playlist on extraction and
the sub option 'Write m3u playlist with extended information.' This will make
EAC add additional information to the playlist like the track play time.
- Automatically write status report after
extraction. This makes EAC write a status report (log file) after extraction
in which you can find possible errors and the used settings.
- On extraction, start external compressors
queued in the background. This controls how many compressor windows will
open and encode while you are ripping. It is unnecessary to select more than
one.
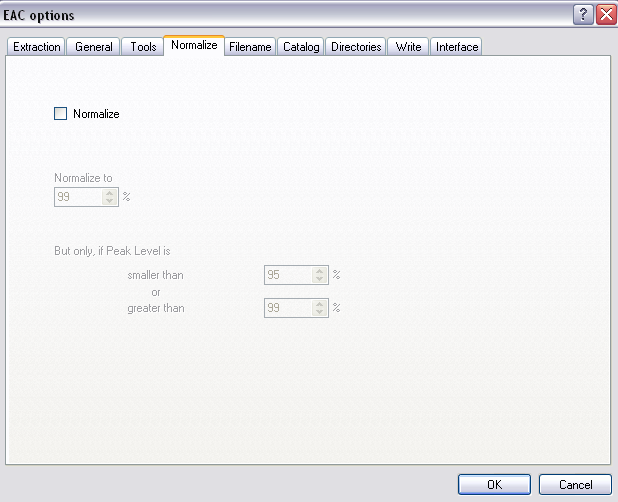
- Select the Normalize tab.
- If Normalize is checked, then deselect it.
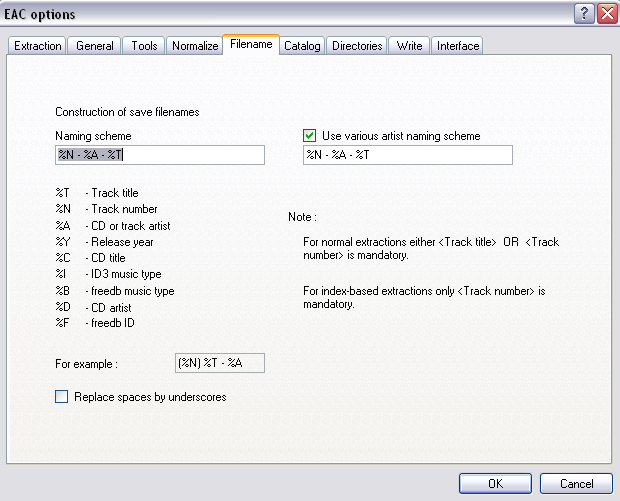
- Select the Filename tab. You'll notice
two
input fields with text in them. Below you see %N - %A - %T in those fields. EAC generates filenames using this string
which would look like Number - Artist - Title. You can experiment with the various combinations
for the filename construction. In any case, please keep the filenames
simple and put the track number (%n) first.
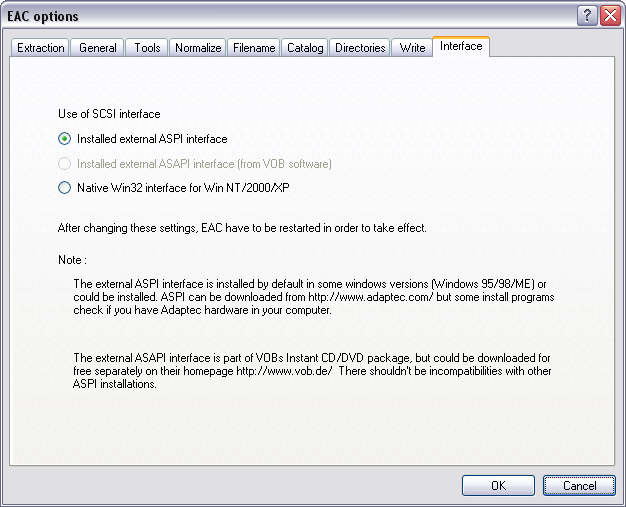
-
Select the
Interface tab and tick 'Installed external ASPI interface.' This would be the
wnaspi32.dll file you copied to your EAC folder after installation. This
section is complete. Select Ok.
Verifying or setting the drive options
This is one of the most
important parts of the EAC configuration.
- Press F10. Select the warning dialog box
away.
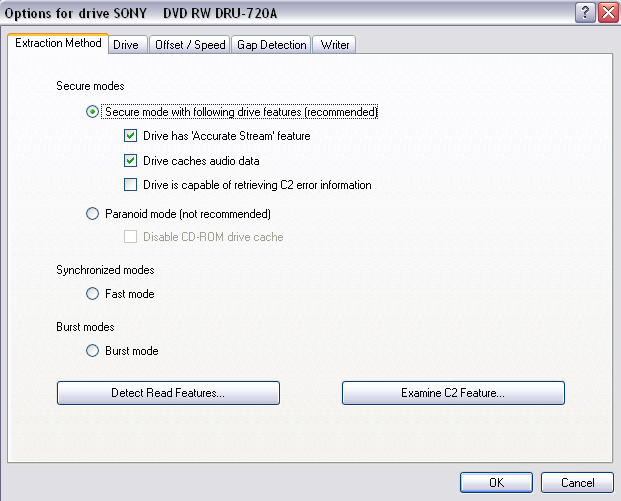
- Select the 'Extraction Method' tab.
Secure Mode *must* be enabled!
- Check 'Drive has 'Accurate Stream' feature'
and 'Drive caches audio data.'
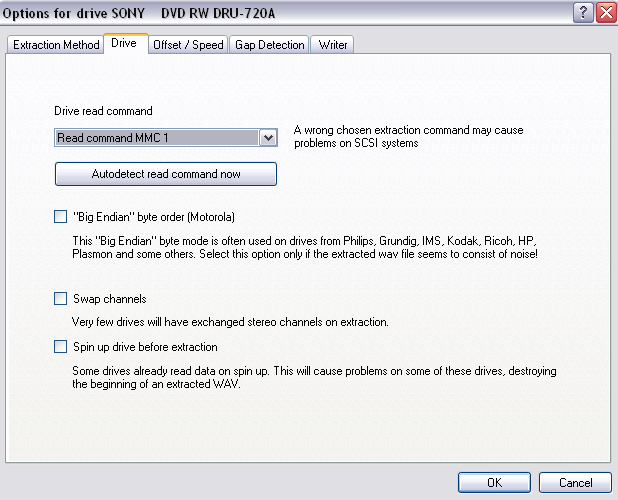
Select the Drive tab.
- Select the dropdown menu and select Autodetect read command.
- Select Autodetect read command now. After a few seconds EAC returns the
correct read command for your drive.
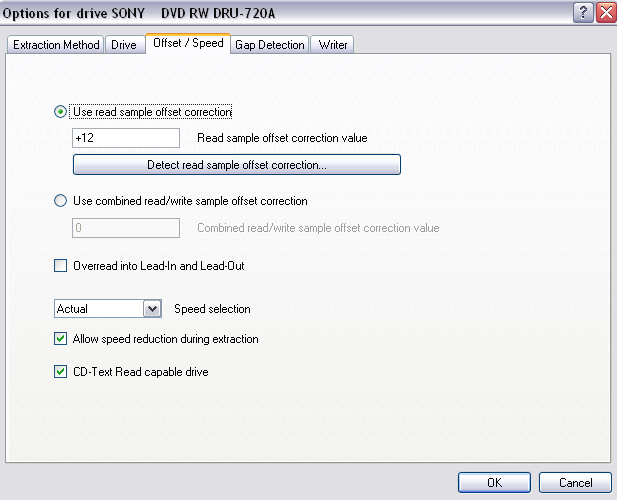
Select the Offset/Speed tab
- Check 'Use read sample offset correction'
- In the input field below, enter the offset correction value for your
drive which can be found on
this
site. If you don't know what drive you have or what too look for, your
drive will be listed at the of the window below. It's likely to be
easier searching for the model numbers. (e.g. DRU-720A)
- Check 'Allow speed reduction during extraction' and 'CD-Text Read
capable drive.'
Select the Gap Detection tab
- It is recommended to use Detection Method A, and Secure here. Some
drives may not use these settings, if this is the case when you are
detecting gaps, try changing them.
- Select secure in the detection accuracy dropdown list.
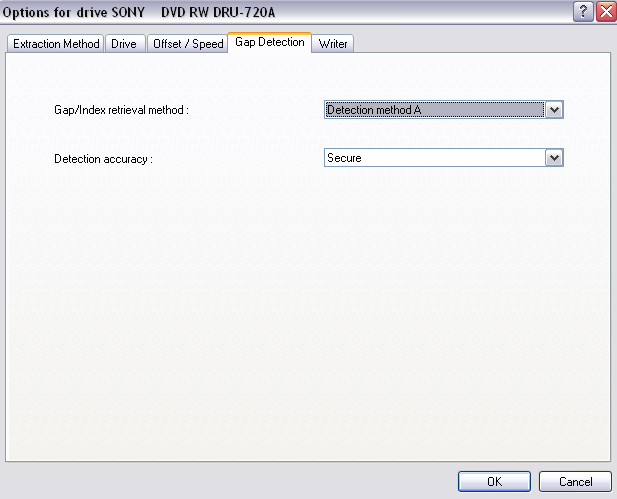
Select OK.
Setting the encoder options
The configuration of EAC and the drives is done. Next step is to configure
the encoder settings. These differ from compressor to compressor, but the four
steps lists below will remain the same.
- Press F11
- Select External Compression
- Check 'Use external program for compression.
- Select
User Defined Encoder from the Parameter passing scheme dropdown box.
Use the links below to advance to your preferred encoder.
- LAME mp3
- FLAC
- Monkey's Audio
- Ogg Vorbis
LAME mp3
The first thing you need to do is get
LAME. (This version is recommended by the experts at
Hydrogen Audio).
- Open the downloaded zip file. Extract the lame.exe file to the EAC
installation path. (default: C:\Program Files\Exact Audio Copy\)
- Back in EAC set 'Use file extension' to .mp3 (including the dot in
front). Next
we need to set the path to the LAME executable.
- If you stored it in the recommended location, you can just copy and
paste C:\Program Files\Exact Audio Copy\lame.exe.
- Further set the last four options
on the tab as shown in the screenshot below.
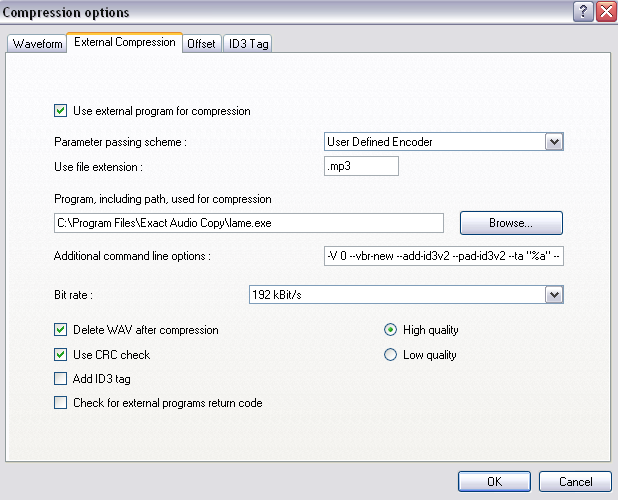
On the
External Compression tab
enter one of following command lines in the Additional command line options input
field:
- -V 2 --vbr-new --add-id3v2
--ignore-tag-errors --ta "%a" --tt
"%t" --tg "%m" --tl "%g" --ty "%y" --tn "%n" %s %d
- -V 0 --vbr-new --add-id3v2 --ignore-tag-errors --ta "%a" --tt
"%t" --tg "%m" --tl "%g" --ty "%y" --tn "%n" %s %d
- -b 320 --add-id3v2 --pad-id3v2
--ta "%a" --tt "%t"
--tg "%m" --tl "%g" --ty "%y" --tn "%n" %s %d
List of recommended settings
|
Switch |
Preset |
Target Kbit/s |
Bitrate range kbit/s |
Bitrate designation |
|
-b 320 |
--preset insane |
320 |
320 CBR |
320 |
|
-V 0 --vbr-new |
--preset fast extreme |
245 |
220...260 |
V0 |
|
-V 2 --vbr-new |
--preset fast standard |
190 |
170...210 |
V2 |
- For those who are still used to the older --alt-preset settings, here is a short
overview. -V 2 --vbr-new equals to --alt-preset standard, -V 0 --vbr-new
equals to --alt-preset extreme and -b 320 equals to --alt-preset insane. Just ignore the Bit rate field and the high and low quality selectors.
- I've been made aware of a few people who have problems with LAME.exe not
encoding the .wav files to .mp3. Apparently there is a problems with
bad genre info causing lame.exe not to work properly. I've added a fix
for that to the command lines above.
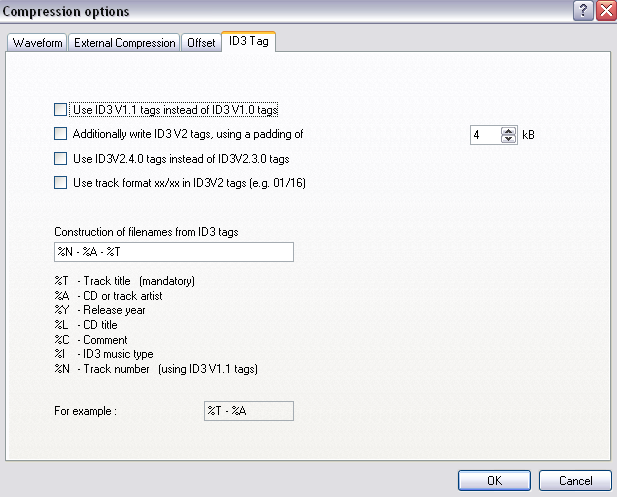
- Check if the settings on the ID3 Tag tab page match the settings of the
screenshot below.
Select
OK to save the settings.
Continue reading at
Saving the compression options to a profile
FLAC
The first thing you need to do is get
FLAC.
- Open the downloaded zip file. Extract the flac.exe file to the EAC
installation path. (default: C:\Program Files\Exact Audio Copy\)
- Back in EAC set 'Use file extension' to .flac (including the dot in
front). Next
we need to set the path to the FLAC executable.
- If you stored it in the recommended location, you can just copy and
paste C:\Program Files\Exact Audio Copy\flac.exe.
- Further set the last four options on the tab as shown in the screenshot
below.
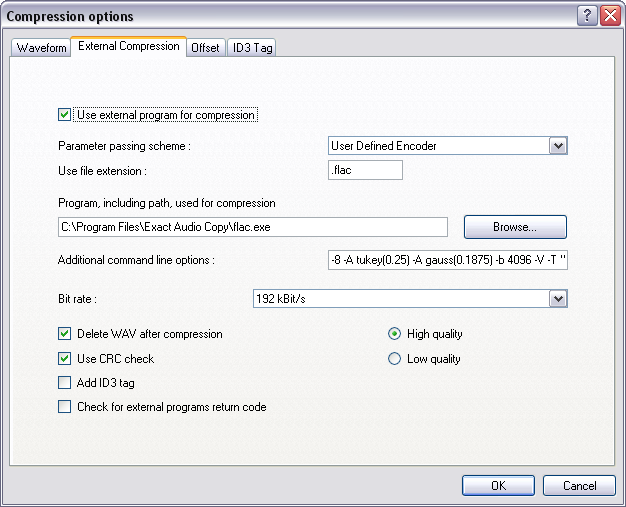
On the
External Compression tab
enter one of following command lines in the
Additional command line options input
field:
- -V -5 -T "artist=%a" -T "title=%t" -T
"album=%g" -T "date=%y" -T "tracknumber=%n" -T "genre=%m" %s
- -8 -A tukey(0.25) -A gauss(0.1875) -b 4096 -V -T
"artist=%a" -T "title=%t" -T "album=%g" -T "date=%y" -T "tracknumber=%n" -T
"genre=%m" %s --sector-align
- Just ignore the Bitrate field and the high and low quality selectors.
The bitrate of the compressed files will be "Lossless" no matter the
compression (5/8) level used.
- Check if the settings on the ID3 Tag tab
page match the settings of the screenshot below.
Select
OK to save the settings.
Continue reading at
Saving the compression options to a profile
Monkey's Audio
The first thing you need to do is get
Monkey's Audio.
You will also
need
wapet.
The Monkey's Audio format supports the so-called APEv2 tags but the command line
encoder doesn't. Therefore, we point EAC to wapet which does support APEv2
tags and, which on its turn, points to the Monkey's Audio compressor.
- You'll have to download and install the full Monkey's Audio Windows
suite. When that's done you'll find the command line encoder mac.exe in the
Monkey's Audio installation folder (default: C:\Program Files\Monkey's
Audio\). Copy and paste it to C:\Program Files\Exact Audio Copy\
- Extract the wapet.exe to C:\Program Files\Exact Audio Copy\
- Back in EAC set Use file extension to .ape (including the dot in front).
Next we need to set the path to the wapet executable.
- If you stored it in the recommended location, you can just copy and
paste C:\Program Files\Exact Audio Copy\wapet.exe
- Further set the last four options
on the tab as shown in the screenshot below.
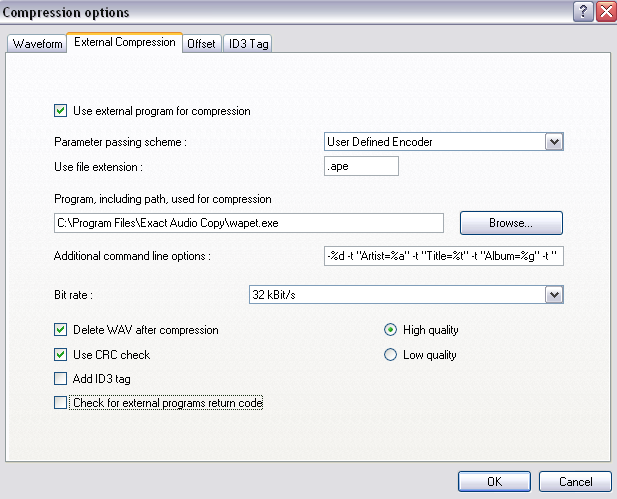
On the
External Compression tab
enter one of following command lines in the
Additional command line options input
field:
- %d -t "Artist=%a" -t "Title=%t" -t
"Album=%g" -t "Year=%y" -t "Track=%n" -t "Genre=%m" mac.exe %s %d -c2000 -v
- %d -t "Artist=%a" -t "Title=%t" -t
"Album=%g" -t "Year=%y" -t "Track=%n" -t "Genre=%m" mac.exe %s %d -c3000 -v (Recommended)
- %d -t "Artist=%a" -t "Title=%t" -t
"Album=%g" -t "Year=%y" -t "Track=%n" -t "Genre=%m" mac.exe
%s %d -c4000 -v
- Just ignore the Bit rate field and the high and low quality selectors.
- Check if the settings on the ID3 Tag tab page match the settings of the
screenshot below.
Select
OK to save the settings.
Continue reading at
Saving the compression options to a profile
Ogg Vorbis
The first thing you need to do is get
Ogg
Vorbis.
- Open the downloaded zip file. Extract the oggenc2.exe file to the EAC
installation path. (default: C:\Program Files\Exact Audio Copy\)
- Back in EAC set 'Use file extension' to .ogg (including the dot in
front). Next
we need to set the path to the OGG executable.
- If you stored it in the recommended location, you can just copy and
paste C:\Program Files\Exact Audio Copy\oggenc2.exe.
- Further set the last four options
on the tab as shown in the screenshot below.

On the
External Compression tab
enter one of following command lines in the
Additional command line options input
field:
- -q6 -a "%a" -t "%t" -l "%g" -d "%y" -N "%n" -G "%m" %s
- -q8 -a "%a" -t "%t" -l "%g" -d "%y" -N "%n" -G "%m"
%s
- -q10 -a "%a" -t "%t" -l "%g" -d "%y" -N "%n"
-G "%m" %s (Recommended)
- Just ignore the Bit rate field and the high and low quality selectors.
- Check if the settings on the ID3 Tag tab page match the settings of the
screenshot below.
Select
OK to save the settings.
Continue reading at
Saving the compression options to a profile
Saving the compression options to a profile
You've just set the options for your preferred
encoder and now it's time to save that configuration to it's very own profile so
you don't have to go that setup again. This is especially convenient if you want to use several different encoders
because each time you change the
compression options in EAC the old settings will be lost. You can use one of two
ways to create your new profile(s).
1st Method
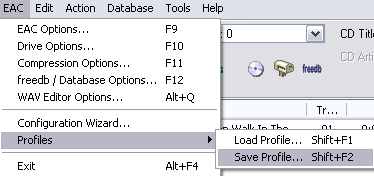
- Enter a name for the profile. I suggest naming it after whichever
encoder it is configured for. That way, there will be no confusion on
which is which later down the road.
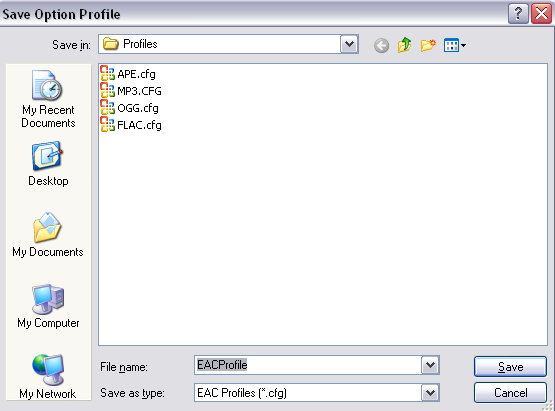
- Now choose a save location. There is a Profiles folder in EAC's default
installation folder. (C:\Program Files\Exact Audio Copy\Profiles\)
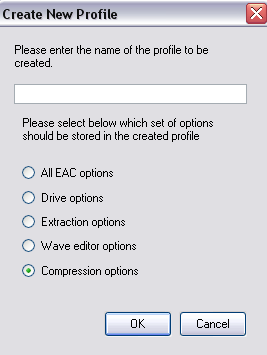
2nd Method
- In the status bar on the bottom of the EAC main
window you'll notice Load,
Save,
New and
Delete
buttons. With these buttons you can manage profiles in EAC.

- Select
the New button. Provide a name for the profile, check All
Compression options and
select
OK. You've created and
automatically saved your profile to C:\Program Files\Exact Audio
Copy\Profiles\.
Your new profile should now be added to the
dropdown box on the left of the buttons. If you have several profiles in the
list you can switch between those by selecting one from the list and selecting
the
Load button. The second method is the better of the two for it's simplicity and time
saving effectiveness. You may now continue setting another compressor
or another profile, or you can start using EAC.
2. Using EAC
Insert the cd you want to rip in your cd-rom and
wait for EAC to request the cd information in the online freedb database. Verify the titles because the information is sent in by volunteers to freedb and often contains typos.
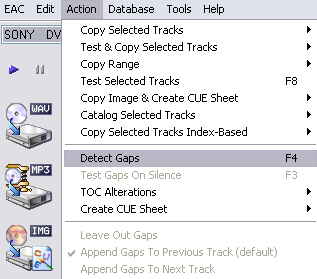
Ripping an audio cd
This is the most common used extraction method.
Repeat this process each time you rip a disc.
- Select only the wanted tracks, or none at all if you wish to rip the
entire disc.
- Press F4. EAC will now detect the gaps between tracks of the
entire disc and shouldn't take very long.
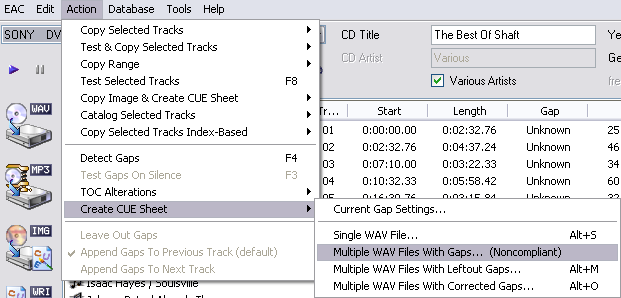
- Create a CUE Sheet by selecting Action > Create CUE Sheet > Multiple WAV
Files With Gaps... (Noncompliant) from the menu bar.
- Save the .cue in the same folder you plan to save the compressed files
in.
- Press Shift+F6. The folder that you saved the .cue in should be
showing at this point.
- Select Save if this is the location where you indeed want to save the
compressed files.
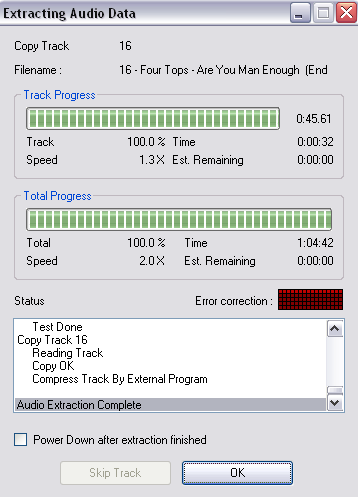
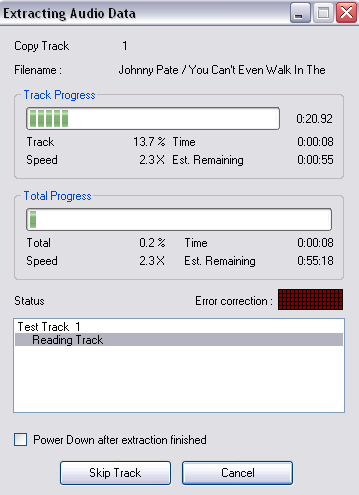
EAC will now start the extraction process. It will test read each track for
errors and then read, copy and then compress the track using the external
compressor. You will see another pop up during extraction. This is
the external compressor encoding the file. It looks just like the window
you get by clicking Start > Run and typing cmd.
Do not close this window! It will open and close as it begins
and finishes the compression, respectively. During extraction you'll sometimes notice red
dots lighting up in the extraction dialog window and after the extraction
completed you get a log with things like Peak Level and
Track Quality.
When a Read Error or Sync Error occurs, there's an
uncorrectable error in the read audio data. After extraction you'll get a list
of the exact locations of the suspicious positions.
EAC has now completed the
extraction process.
-
Click OK.
Do not close EAC because the external compression
quite possibly be a track or two behind the extraction process. Be sure all
encoding is finished before exiting EAC. Open the folder where you saved the compressed files.
There will be a .log file. This file contains information such as the
output format, the command line which was used, pre-gap lengths, peak levels,
track quality, CRC checksums, and any errors that occurred during the
extraction. You may want to compare the CRC checksums in the .log to the ones
listed in EAC to make sure they actually do match. In the same folder, there should be an .m3u playlist which you can
drop into the player of your choice and it will load all of the tracks for you.
Congratulations! You've just made a proper rip.